Installation and Upgrade
a. First Time Installation or Upgrade
The following steps are required for a new installation of the module or an upgrade to a newer version.
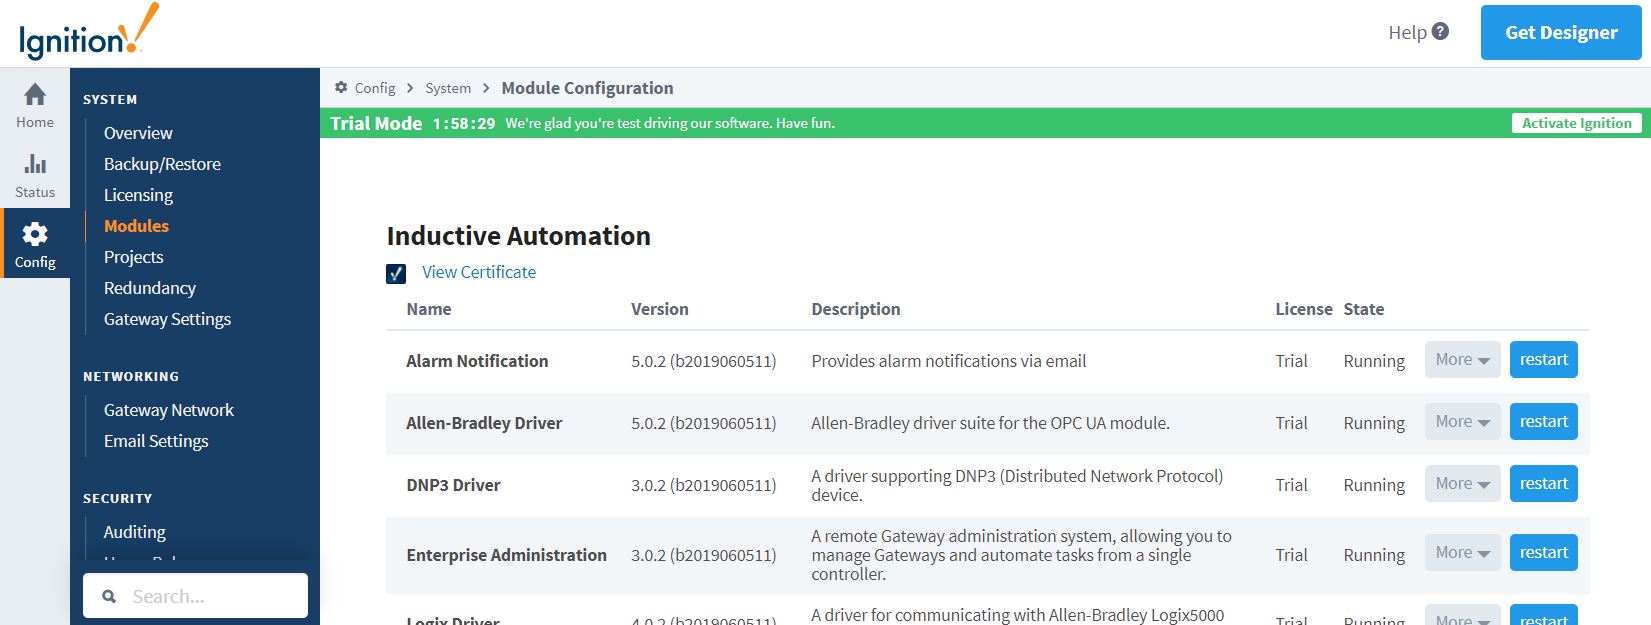
Step 1
On the Gateway Webpage, select Config > SYSTEM > Modules to open the Module Configuration page.
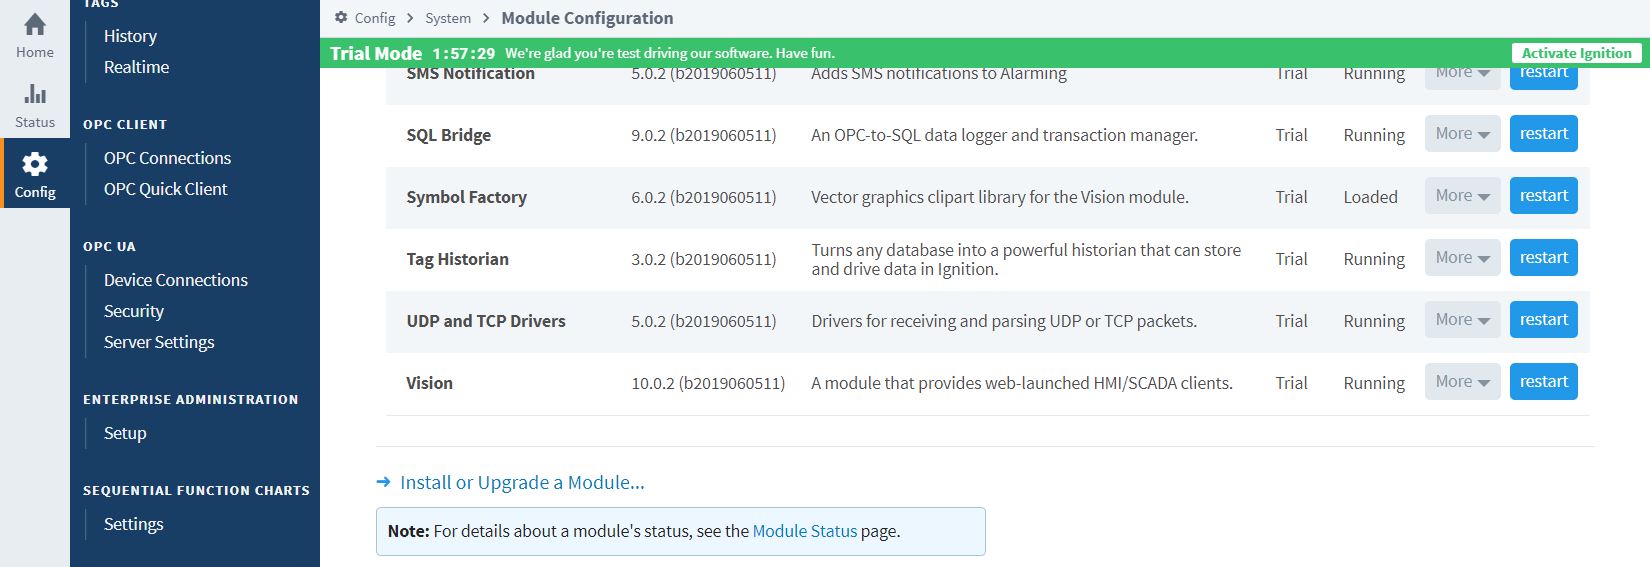
Step 2
Scroll to the bottom on the list, find the blue arrow, and click the Install or Upgrade a Module link.
Step 3
Click Choose File, select a .modl file that you have previously downloaded.
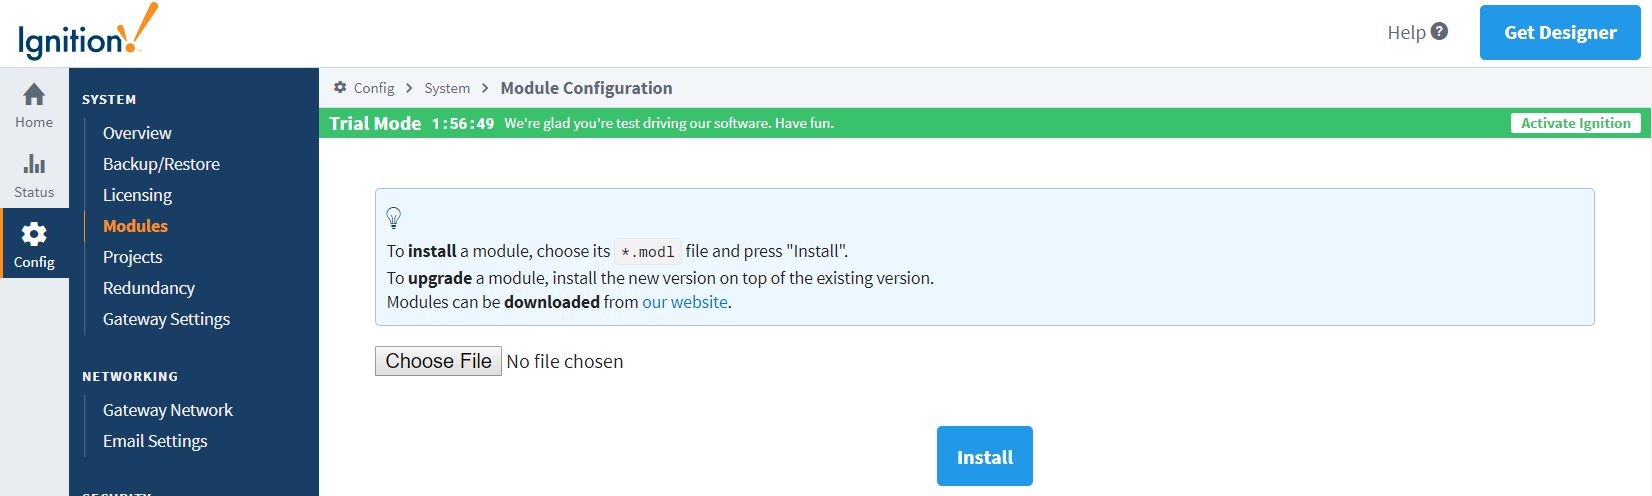
Step 4
Click Install.
- When the page reloads, you can now see the module you installed in the list of modules.
Step 5
Restart Ignition for the changes to fully take effect.
b. First Time Installation Only
The following steps are only required for a new installation of the module. If you have not already done so, follow the steps above to install the module.
These first time installation only steps are the same as the configuration steps found on the configuration page.
Ewon Configuration
When setting up an Ewon, follow all standard Ewon Flexy documentation and installation guides. Documentation, installation guides, and more for the Ewon Flexy can be found at https://websupport.ewon.biz/support.
In addition to the standard Ewon Flexy documentation, follow these additional steps to prepare the Ewon for use with the Ignition Ewon® Connector.I. Link Ewon to Talk2M
Step 1
Open the Ewon web page.
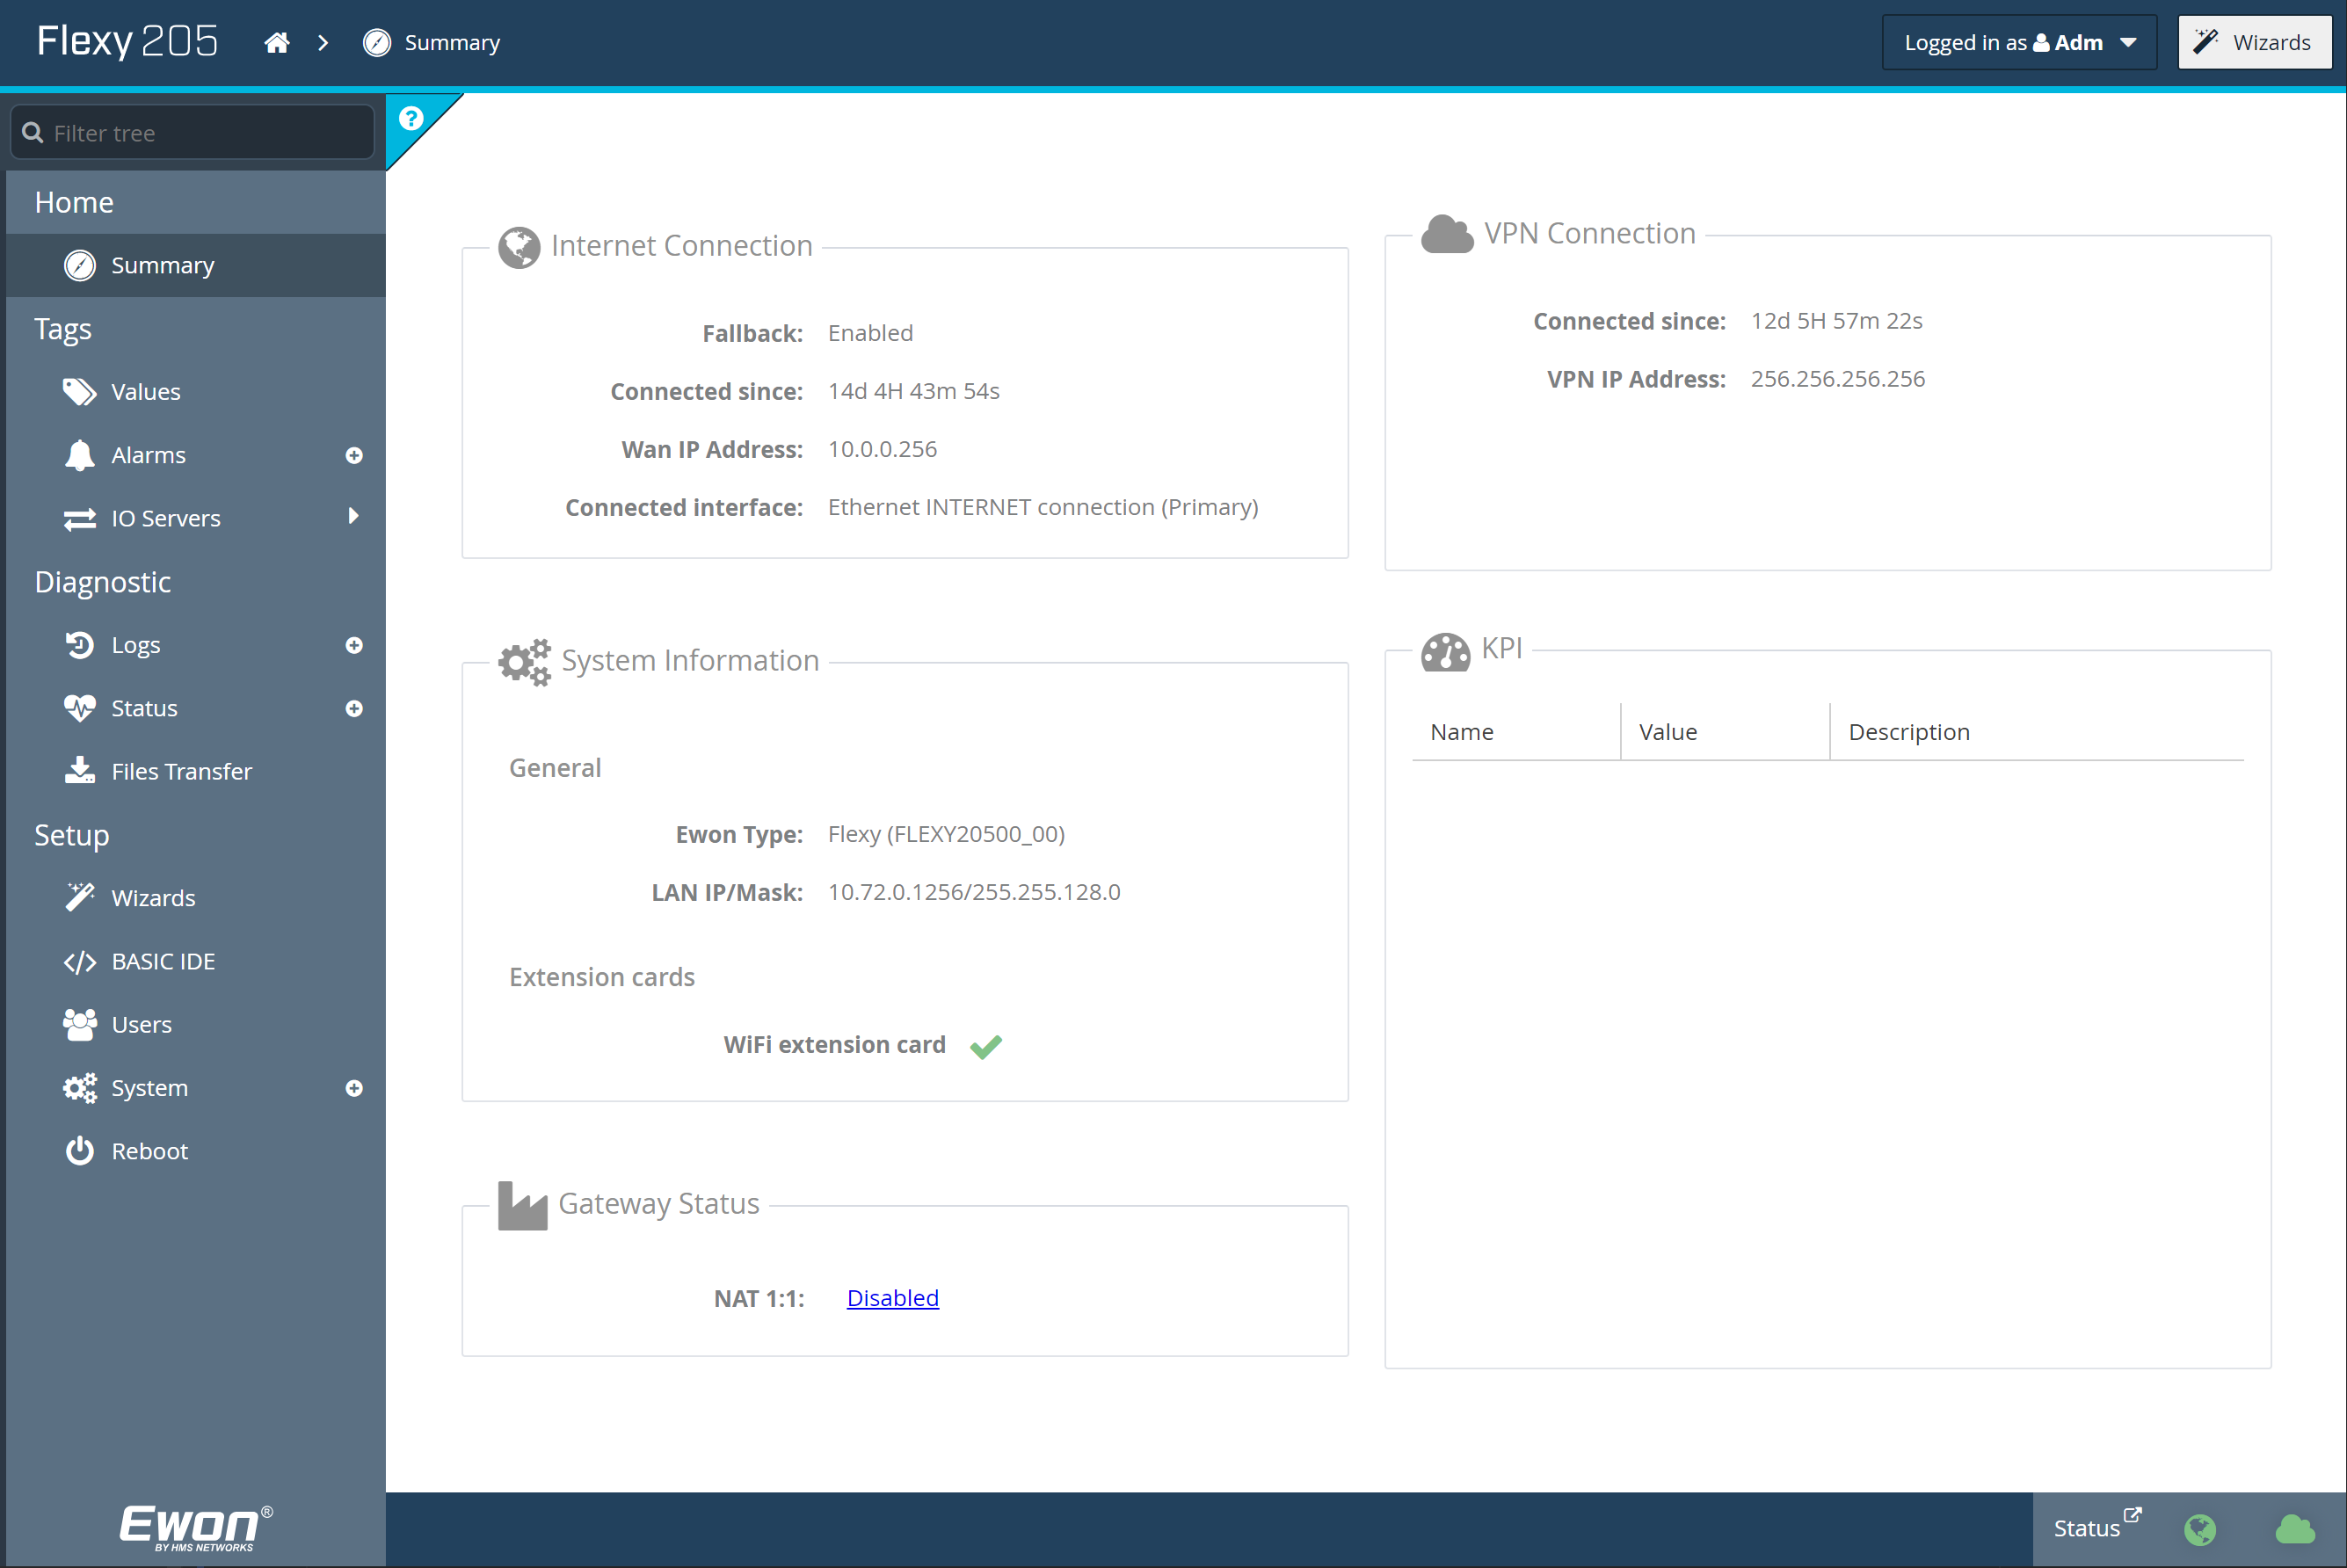
Step 2
Navigate to the VPN Wizard page by clicking Wizards at the top right of the page, and select VPN.

Step 3
Select the Configure Talk2M connectivity option.
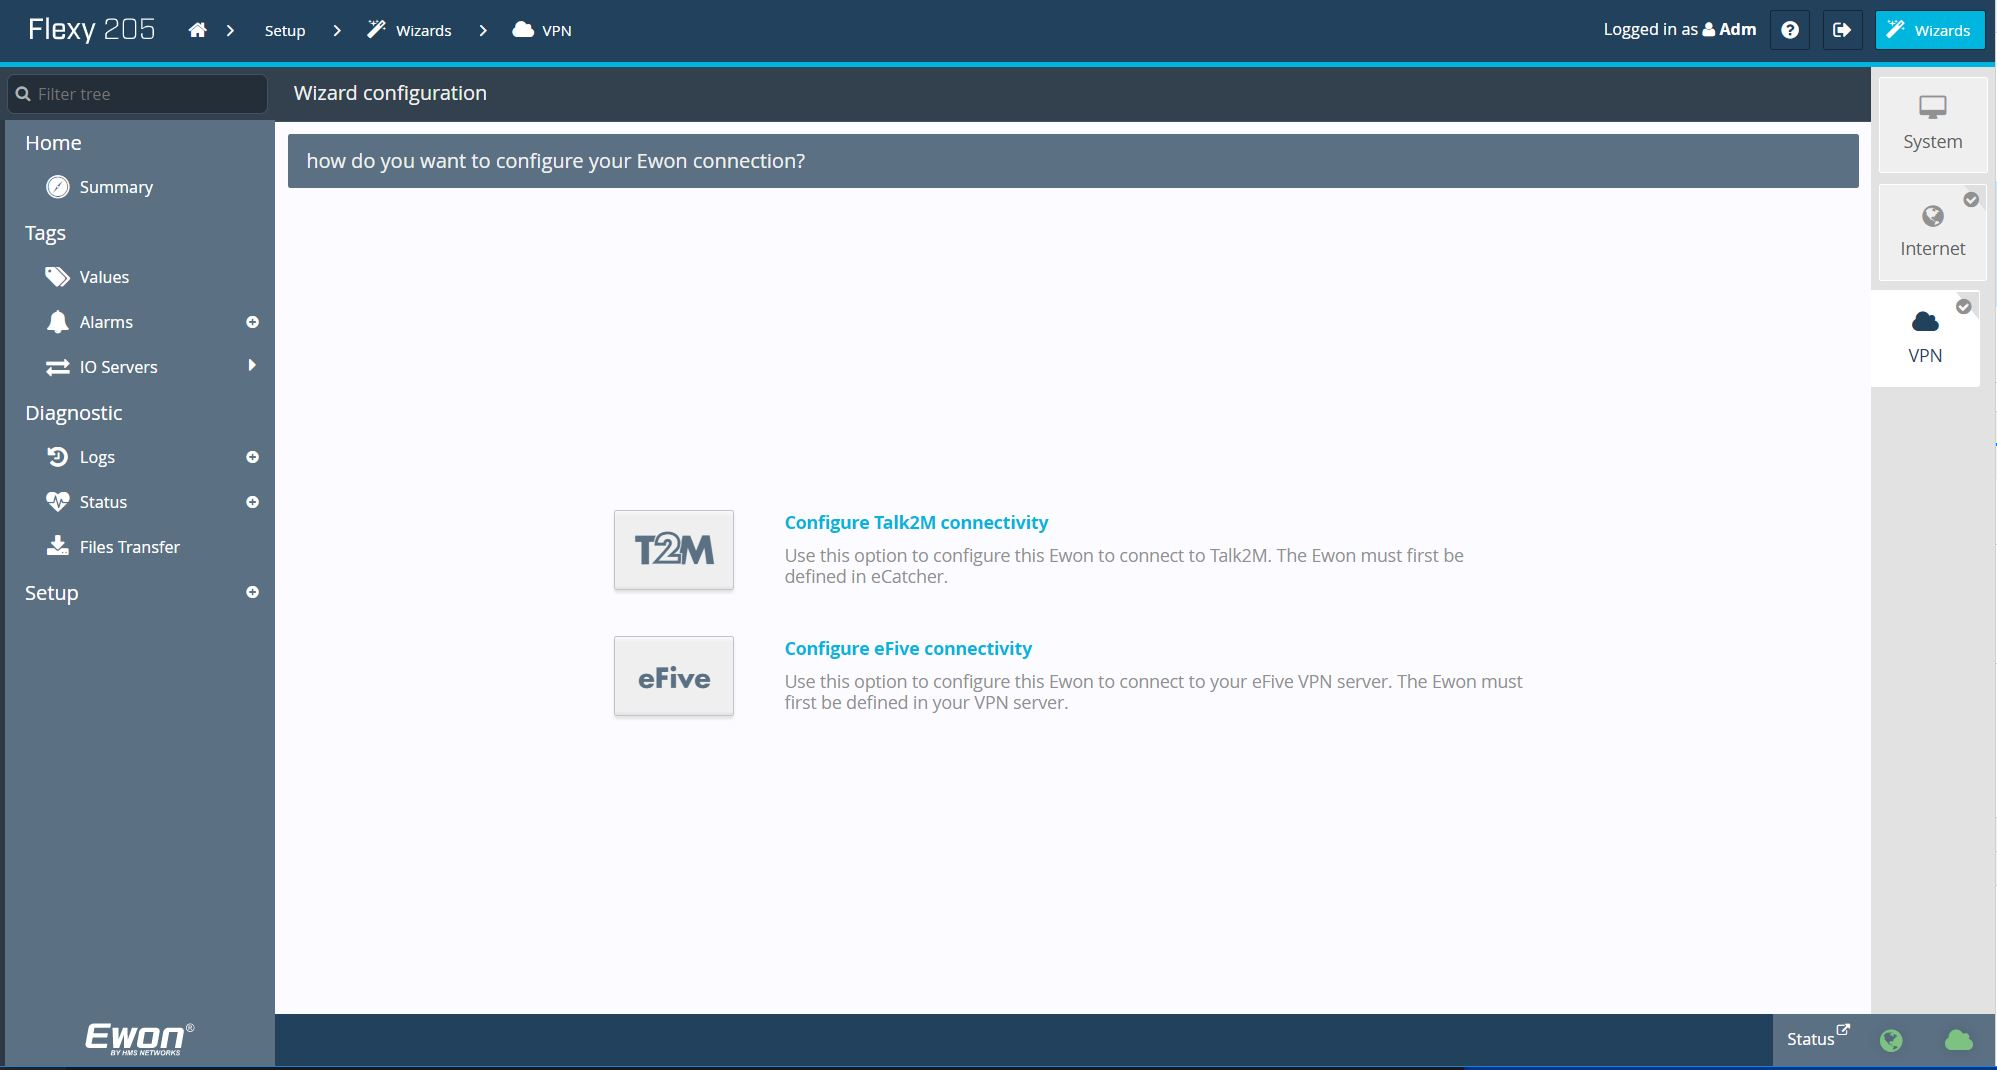
Step 4
Follow the prompts to connect the Ewon to Talk2M.
Step 5
Once the VPN Wizard is complete, you may proceed to the next section.
II. Setup Historical Logging for Tags
Step 1
Open the Ewon web page.
Step 2
Navigate to the Values page (On the left-hand menu, click Tags > Values).
Step 3
Change the MODE to Setup.
Step 4
For each tag that requires logged data, double-click the tag to open the Tag configuration menu.
Step 4a
Scroll down to the Historical Logging section and check the Historical Logging Enabled checkbox.
Step 4b
In the same Historical Logging section, enable either deadband or interval logging.
The Logging Deadband field triggers logging when the tag's value changes by a particular amount. For example, a logging deadband of 2 means that a tag will be logged when the value changes by 2 or more. A negative value in the logging deadband field disables logging on value change.
The Logging Interval field triggers time-based logging. For example, a logging interval of 60 means that the tag will be logged every 60 seconds. A logging interval of zero (0) disables time-based logging.
Step 4c
Once configured, click Update Tag on the bottom right of the page.
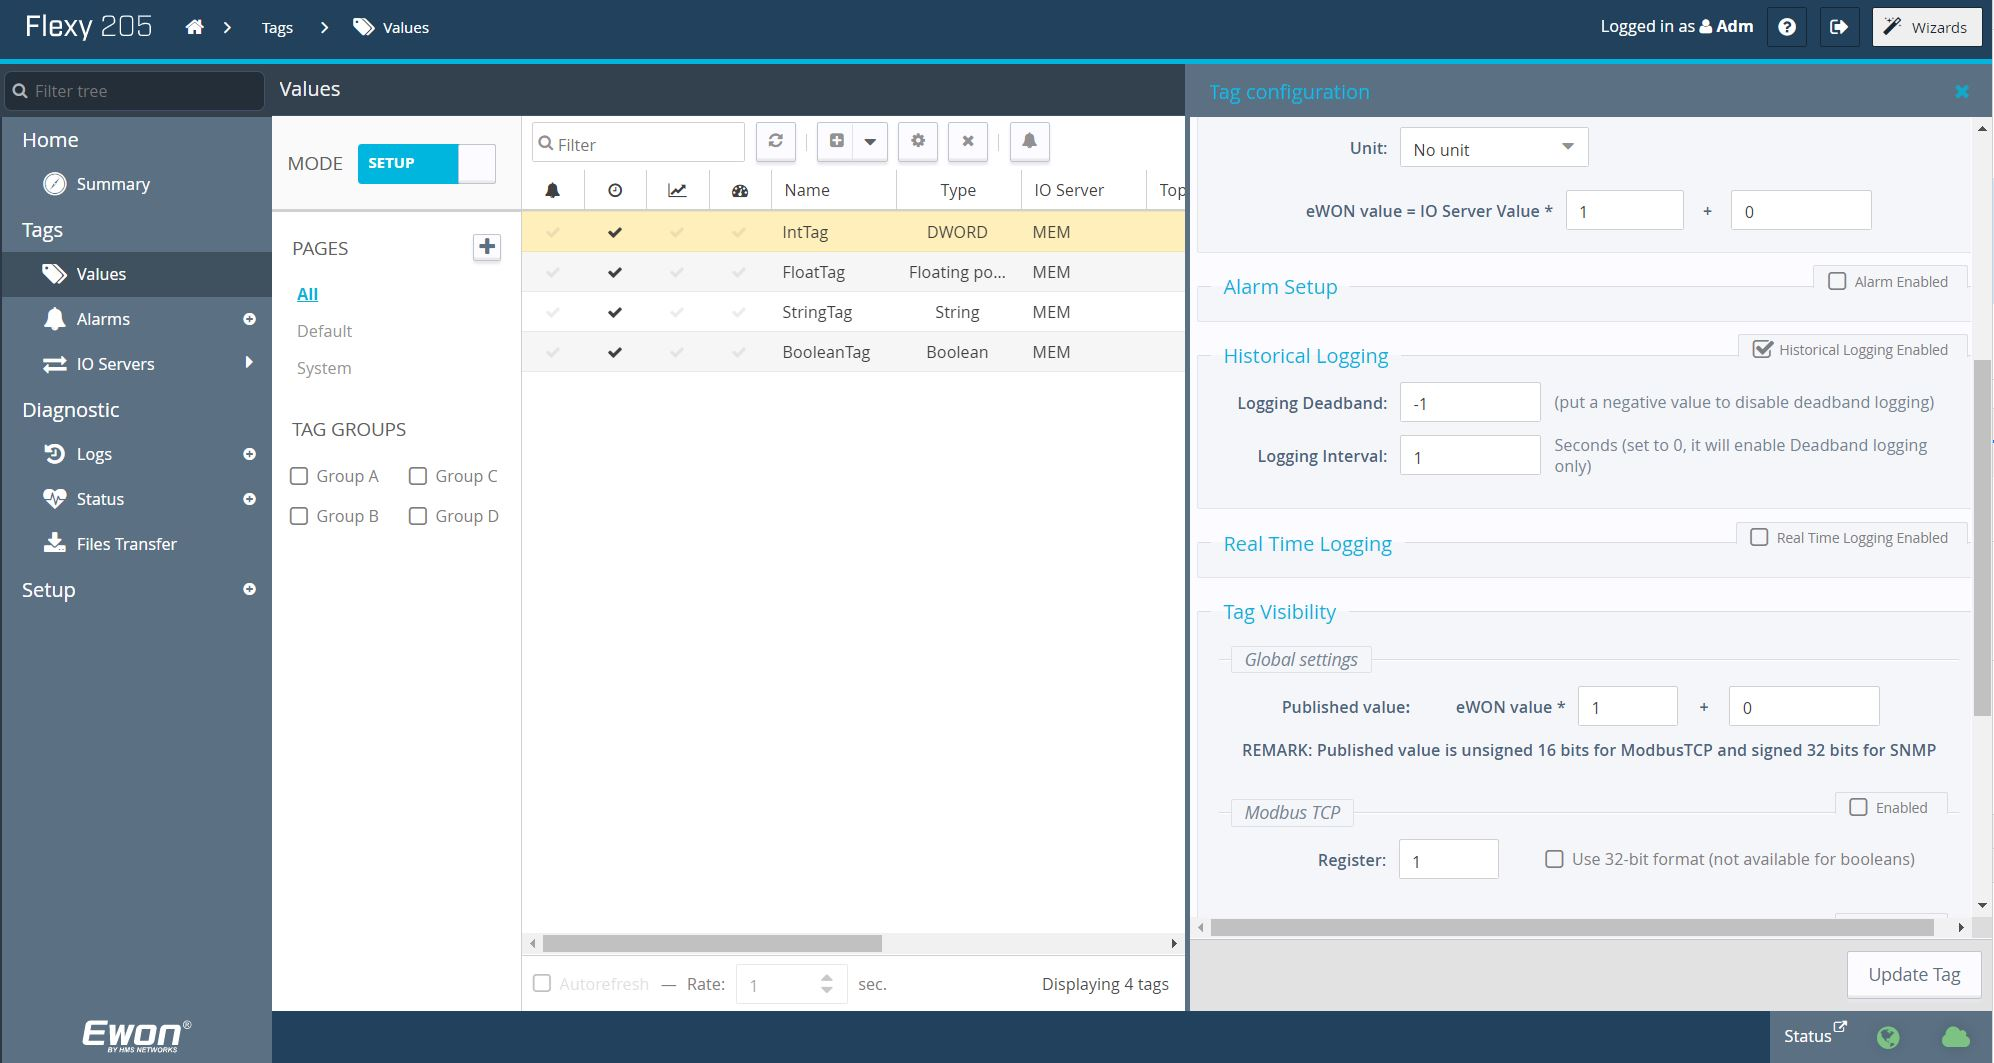
Step 5
Once all tags have been configured, you may proceed to the next section.
You may change the MODE back to View to see the tag values once you are done configuring the tags.
III. Enable Historical Data In DataMailbox
Step 1
Open the Ewon web page.
Step 2
Navigate to the Data Management page (On the left-hand menu, click Setup > System > Main > Data Management).
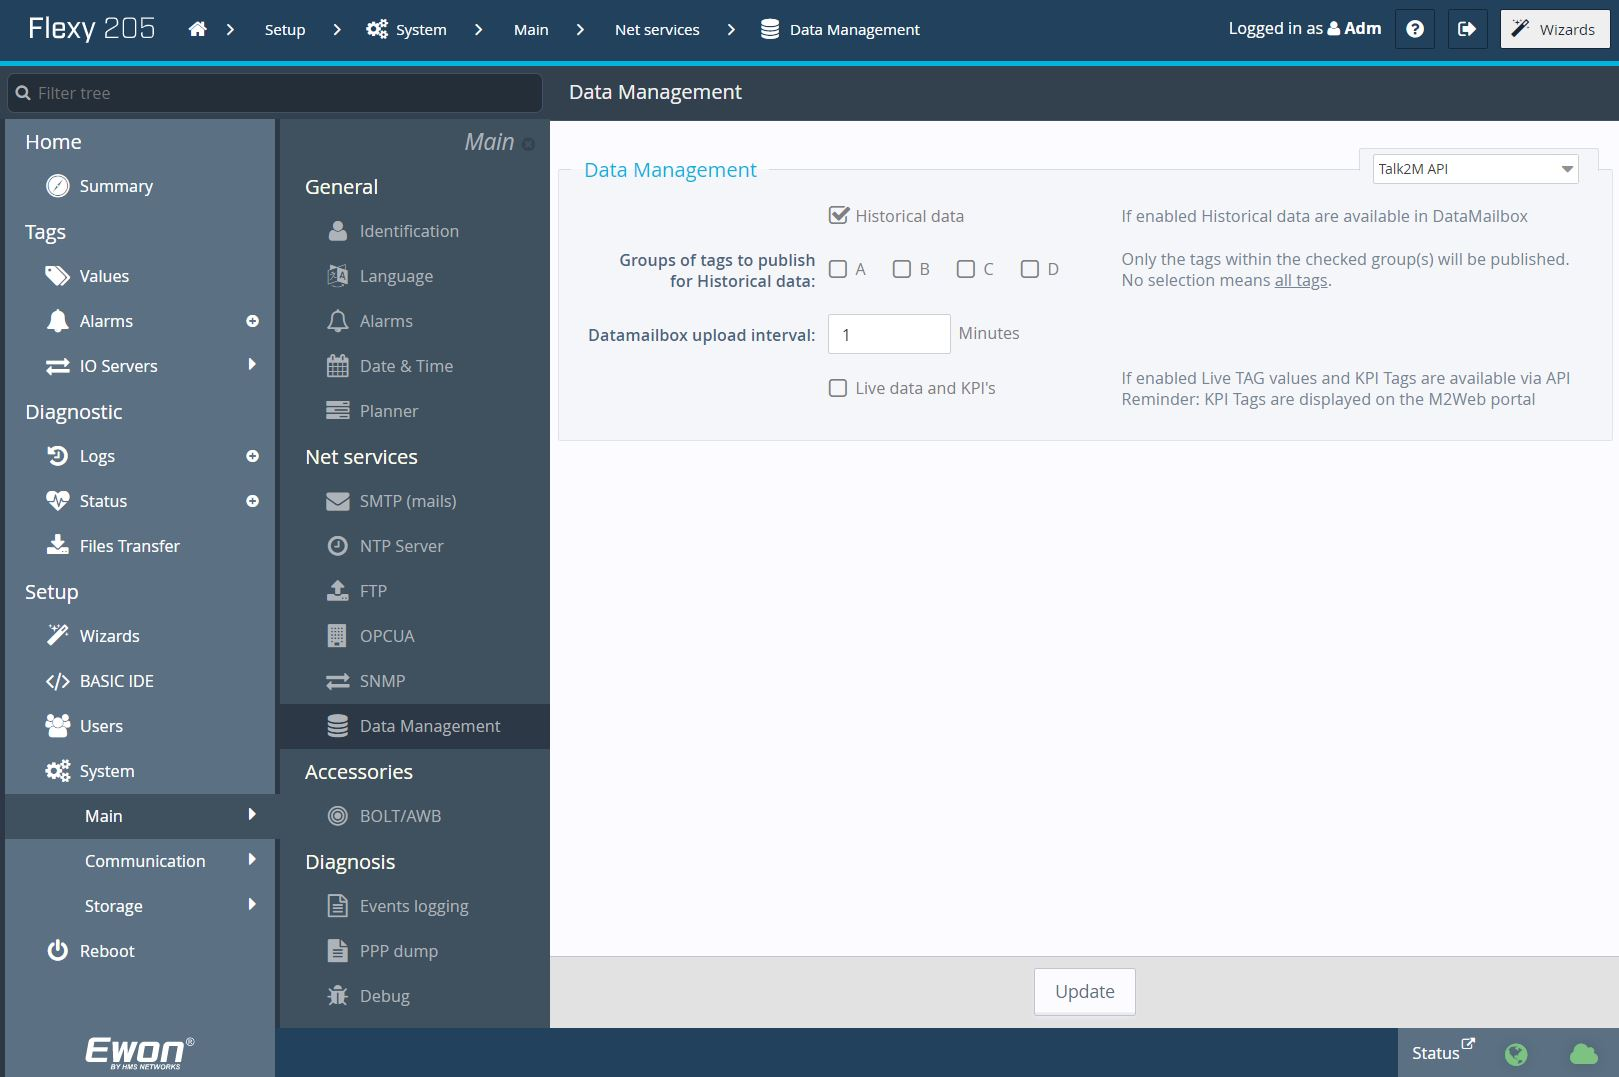
Step 3
Check the Historical Data checkbox.
Step 4
Set the DataMailbox upload interval to a reasonable number for your application.
The DataMailbox upload interval sets how often the Flexy will send batches of historical data to DataMailbox and does
not affect the frequency at which tag values are logged.
Step 5
Click Update at the bottom of the page to save the changes.
Step 6
Once the changes have been saved, you may proceed to the next section.
Connector Configuration
Step 1
Open the Ignition Gateway web page.
Step 2
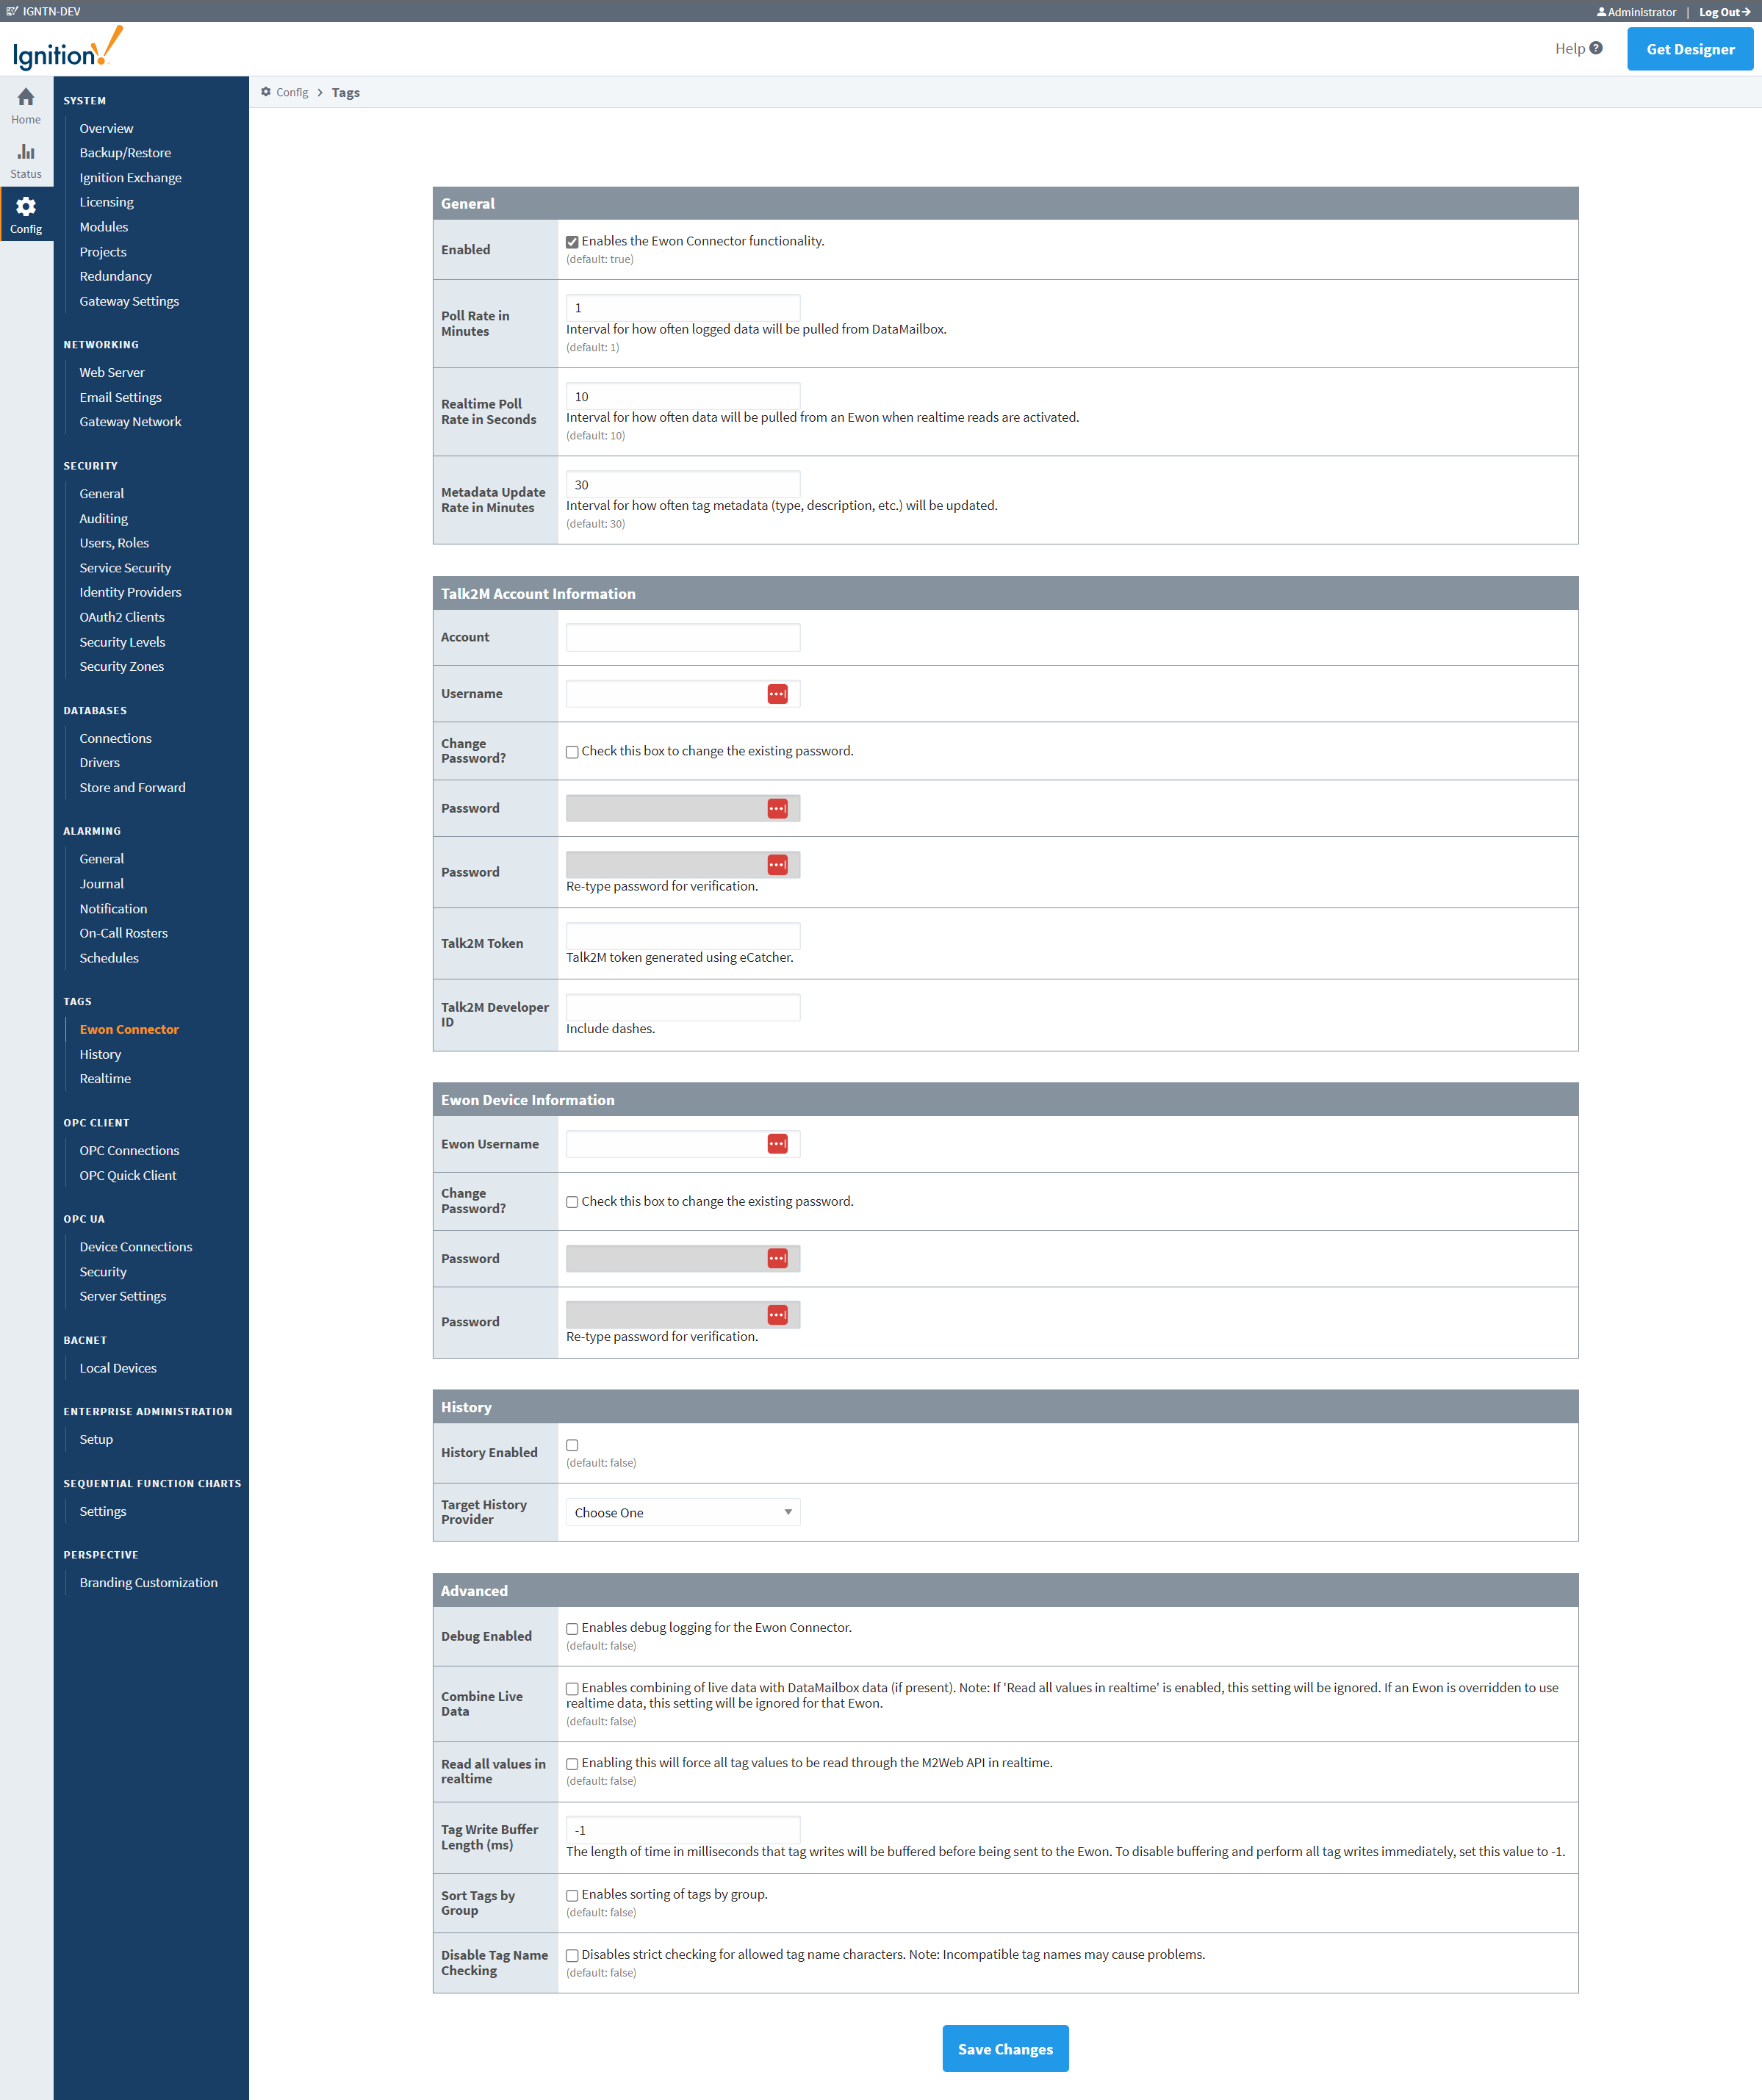
Navigate to the Config page (On the left-hand menu, click Config).
Step 3
Under the Tags section, click Ewon Connector.
If the Ewon Connector page is not visible, verify that the Ewon Connector module has been installed correctly.
Step 4
Populate the fields on the Ewon Connector page.
General
Enabled - Option to enable or disable the module.
infoWhen this option is disabled, the module will not run, but can remain installed and configured.
This option is useful for temporarily disabling the module without losing the configuration, or for maintenance purposes.
Poll Rate in Minutes - Option to configure the poll rate for historical data via DataMailbox
infoThis option allows for the configuration of how often the module polls for historical data via DataMailbox.
The default value is 1 minute, but this can be increased (in minute intervals) to reduce DataMailbox usage.
Realtime Poll Rate in Seconds - Option to configure the poll rate for realtime data via M2Web (where applicable)
infoThis option allows for the configuration of how often the module polls for realtime data from an Ewon via M2Web.
The default value is 10 seconds, but this can be increased or decreased (in second intervals) to reduce Ewon and M2Web usage.
Metadata Update Rate in Minutes - Option to configure the poll rate for Ewon/tag metadata updates
infoThis option allows for the configuration of how often the module polls for Ewon/tag metadata. This includes new Ewon devices, new tags, and updated tag metadata such as descriptions and data types.
The default value is 30 minutes, but this can be increased or decreased (in minute intervals) to reduce Ewon and M2Web usage.
Regardless of the value configured, the module will perform an initial metadata update upon startup. Until this initial metadata update is complete, the module will not poll for tag data.
Talk2M Account Information
Account - Option to configure the Talk2M account to use for the module
infoThis option allows for the configuration of the Talk2M account name which will be used for the module.
Username - Option to configure the Talk2M username to use for the module
infoThis option allows for the configuration of the Talk2M username which will be used for the module.
Change Password? - Option to enable the password field for the Talk2M account
infoThis option enables the password field for the Talk2M account. This field is disabled by default to prevent unexpected or accidental password changes.
Password - Option to configure the Talk2M password to use for the module
infoThis option allows for the configuration of the Talk2M password which will be used for the module. This field is disabled by default to prevent unexpected or accidental password changes, and must be enabled by selecting the
Change Password?option above.Talk2M Token - Option to configure the Talk2M token to use for the module
infoThis option allows for the configuration of the Talk2M token which will be used for the module.
Talk2M tokens can be generated using eCatcher. To learn more about Talk2M tokens and how to generate them, please refer to Section 4.6 of the DMWeb API reference guide found at: DMWeb API Reference Guide
Talk2M Developer ID - Option to configure the Talk2M developer ID to use for the module
infoThis option allows for the configuration of the Talk2M developer ID which will be used for the module.
Talk2M developer IDs must be requested from HMS. If you do not have a Talk2M Developer ID, you may request one here: https://developer.ewon.biz/registration.
Ewon Device Information
Ewon Username - Option to configure the Ewon device username to use for the module
infoThis option allows for the configuration of the Ewon device username which will be used for the module. This username must be identical for all linked Ewons.
All linked Ewons must have at least one common user account to enable realtime and write functionality via M2Web. The username and password can be any valid combination, but must be consistent across all linked Ewons.
Change Password? - Option to enable the password field for the Ewon device
infoThis option enables the password field for the Ewon device. This field is disabled by default to prevent unexpected or accidental password changes.
Ewon Password - Option to configure the Ewon device password to use for the module
infoThis option allows for the configuration of the Ewon device password which will be used for the module. This field is disabled by default to prevent unexpected or accidental password changes, and must be enabled by selecting the
Change Password?option above. This password must be identical for all linked Ewons.All linked Ewons must have at least one common user account to enable realtime and write functionality via M2Web. The username and password can be any valid combination, but must be consistent across all linked Ewons.
History
History Enabled - Option to enable DataMailbox historical data logging to a history provider.
infoWhen this option is enabled, the connector will log historical data to the history provider specified in the
Target History Providerfield.When this option is disabled, the connector will only log historical data to the tag provider.
Target History Provider - Option to select the history provider to log historical data to.
infoWhen the
History Enabledoption is enabled, the connector will log historical data to the history provider specified in this field.
Advanced
Debug Enabled - Option to enable debug logging.
infoWhen this option is enabled, the connector will log additional information to the Ignition console. This option is useful for troubleshooting, and includes information such as:
- HTTP request IDs and status updates (i.e., HTTP request started, HTTP request finished)
- Consistent warning logs (i.e., offline Ewon warnings not suppressed after the first warning)
- General connector state information (i.e., start and finish of polling cycles)
Unless you are troubleshooting, it is recommended to leave this option disabled. Debug logging may impact performance.
Combine Live Data: Option to combine live data with historical data.
infoWhen this option is enabled, tags that are read in realtime will be combined with historical data, if available. This option has no effect when the
Read all values in realtimeoption is enabled.The connector will only combine historical data with realtime data if the historical data was already read from DataMailbox. For example, when some tags (not all) are configured to be read in realtime, a DataMailbox transaction will be performed to read the historical data for the tags that are not configured to be read in realtime. If historical data is also included for the tags that are read in realtime, the connector will combine that historical data with the realtime data (instead of omitting the historical data).
Read all values in realtime - Option to always read all tag values in realtime.
infoWhen this option is enabled, all tags will be read in realtime.
This option disables DataMailbox reads. Historical values logged on the Ewon will not be logged in Ignition.
Tag Write Buffer Length (ms) - Option to configure tag write buffering (and the associated buffer length).
infoWhen this option is configured to -1 or any value below the minimum of 100, tag write buffering is not enabled, and tag writes are sent to the Ewon immediately. When this option is configured to a value above the minimum of 100, tag writes will be buffered for the specified length of time before sending them to the Ewon.
Each time a tag is written, it is added to a buffer. If it is the first tag in the buffer, a timer is started. Otherwise, it is added to the existing buffer. When the buffer length timer has elapsed, all buffered tag writes are sent to each Ewon in a single request.
Sort Tags by Group - Option to enable tag sorting by group.
infoWhen this option is enabled, tags are sorted into folders for each Ewon, based on their tag groups.
For each Ewon, a folder is created for each tag group combination and tags are placed in their respective group folder. If a tag is not in a group, it is placed in the root Ewon tag folder. If a tag is in multiple groups, it is placed in the folder with a name that is the concatenation of all groups. For example, if a tag is in the groups
AandC, it will be placed in the folderAC.Disable Tag Name Checking - Option to disable tag name checking.
infoWhen this option is enabled, tag names are not checked for invalid characters.
By default, tag names are checked for invalid characters. If a tag name contains an invalid character, it is replaced with an underscore (
_).
Step 5
Click Save Changes at the bottom of the page to save the changes.
Step 6
Restart Ignition.